Dear eeVRee user,
We would however like to ask you to cooperate with us on improving this breakthrough technology, be it on providing feedback not only on functionality, but also on the user experience, comfort, and features.
As part of the launch of our eeVRee application, we have encountered certain limitations on distribution options and are currently in the work to improve this process with our partners, the Oculus store and vendors. In the meantime, we ask you to understand the requirement for the current, below described, set up and installation process.
To support you with the hardware and software set up, we not only utilized standardized guides and provided our own, but will be also available to provide you with online support on the following date within these times:
14.3.2022
10:00 – 12:00
14:30 – 16:30
On this day we will do an online demonstration of the set up, but in case you encounter any problems, contact us at helpdesk@eevree.com, and we will ensure a 1 on 1 online session where we will guide you through any problematic steps.
We ask you to perform the below described installation process on the 14.3. if possible, so that in case of any issues you will be able to contact us as soon as possible, or on the online sessions.
Thank you, and we wish you a pleasant experience, see you in the mixed reality!
1. Oculus Quest 2 set up
General guide: https://www.oculus.com/blog/you-got-a-quest-2-heres-how-to-set-it-up/ but follow the following steps in order:
1.1. Unpacking
Follow: https://support.oculus.com/articles/getting-started/getting-started-with-quest-2/set-up-quest-headset
1.2. First start:
Power up your Quest 2 with the button on the right side (next to the charging indicator). Then hold the headset on both sides, slowly sliding it up and down your face until the image is clear
1.3. Set up guardian
Follow: https://support.oculus.com/articles/getting-started/getting-started-with-quest-2/space-to-use-quest-2
or
https://www.youtube.com/watch?v=zh5ldprM5Mg
1.4. Get comfortable with the touch controlers
Follow: https://support.oculus.com/articles/getting-started/getting-started-with-quest-2/using-touch-controllers-quest-2
1.5. Now is also a great time to do the introductory Oculus built-in tutorial to get you accustomed to the control and environment. Once you feel comfortable with the setup, follow with the next step
1.6. Connecting to Wi-Fi (required to join Testing United conference and online content)
Follow these steps (for details or troubleshooting, see: https://support.oculus.com/articles/getting-started/getting-started-with-quest-2/index-getting-started-quest-2?intern_source=blog&intern_content=you-got-a-quest-2-heres-how-to-set-it-up )
1.6.1 Press oculus sign on your right Touch controller to pull up your universal menu
1.6.2. Hover over the clock on the left side of the universal menu. When Quick Settings appears, select it to open the Quick Settings panel
1.6.3. Select Wi-Fi
1.6.4. Select the toggle to turn Wi-Fi on, then select the Wi-Fi network you want to connect to and enter the password
1.6.5. Select Connect
1.7. Let the Quest 2 update with newest firmware
2. Oculus Quest 2 companion app for mobile (the PC companion app is not required for eeVRee installation)
2.1. Create a “developer” account on https://developer.oculus.com/sign-up/
Due to the distribution limitations we are currently experiencing, this is a necessary step to finalize the eeVRee installation. You can set up this developer account either with your Facebook ID, or just an email. In the next steps you will use the companion app to enable the developer status on the Oculus Quest 2
2.2. Download the app from Apple or Google store to your phone
Follow: https://support.oculus.com/articles/getting-started/getting-started-with-quest-2/install-oculus-mobile-app
2.3. Log into the companion app with the developer account created in previous steps
2.4. Connect your app to your Oculus Quest 2 as per on screen instructions
If needed, follow: https://www.youtube.com/watch?v=IyO52KZt03c
2.5. After the pairing is complete, ensure that the Oculus Quest 2 headset is still running
2.6. In the mobile companion app, go to Devices (if needed, select the paired headset from previous step)
2.7. Select Developer mode, and toggle the option to true
2.8. Restart you Oculus Quest 2 headset
3.Connecting your Oculus Quest 2 to you PC or Mac
3.1. Use the provided USB-C cable from the charging set to connect the headset to your PC or Mac
3.2. Make sure the headset is turned on, and put it on.
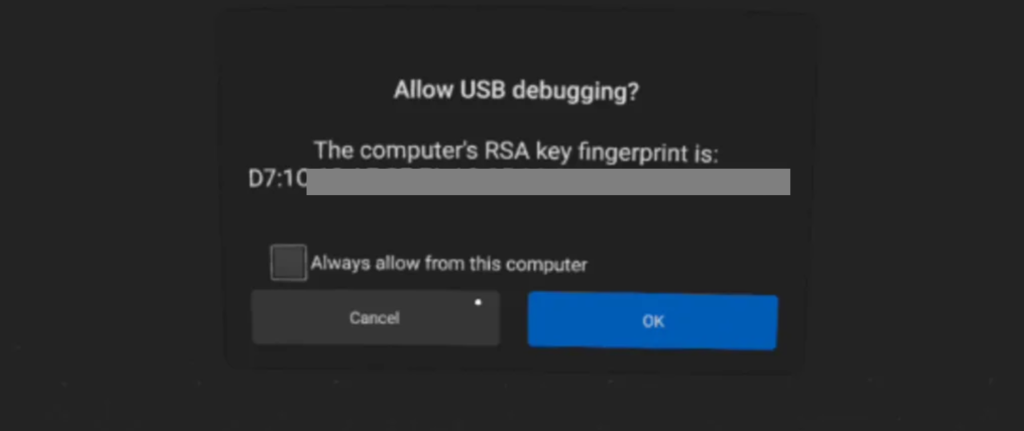
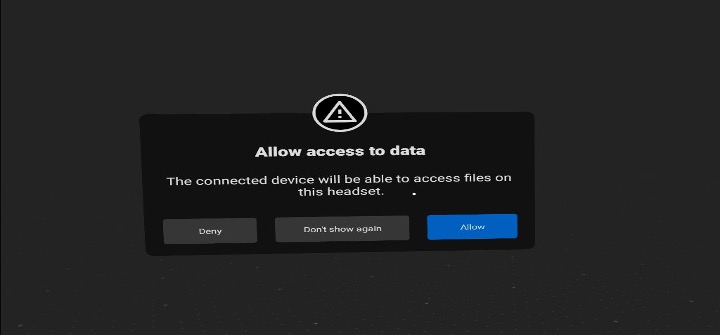
3.3. Within the Oculus Quest 2 headset you will see prompts to allow the connection to your PC or Mac (see pictures). Confirm this connection to enable data transfer
4. Windows users only: Installing the eeVRee application
4.1. You will be provided with an installation file for eeVRee in a separate email, after downloading it to your PC, go to the download folder and unzip the downloaded file
4.2. Ensure your Oculus Quest 2 is connected via USB cable to your PC, is running and you finished the connection setup in step 3.
4.3. Run the downloaded eeVRee installer. This will automatically install the application to your connected headset
4.4. After the installation completes, you can disconnect the headset from your PC
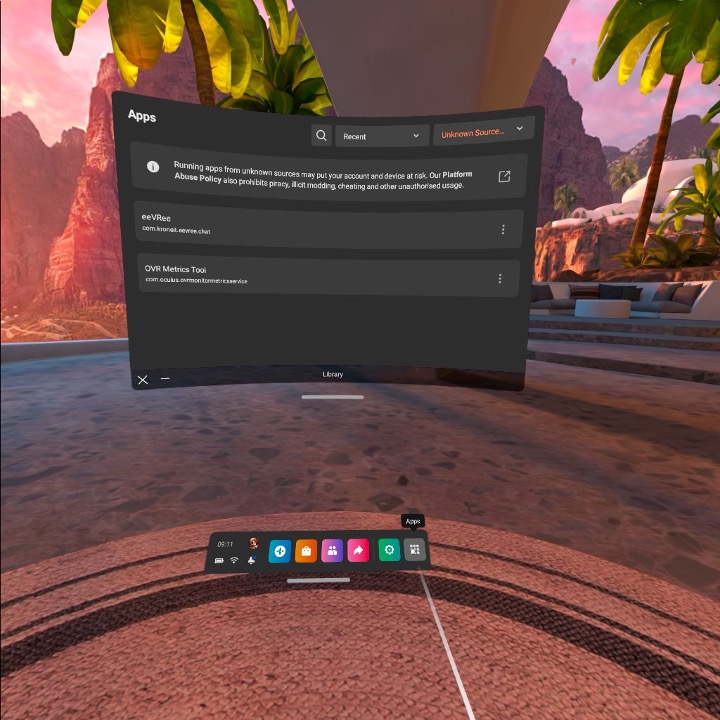
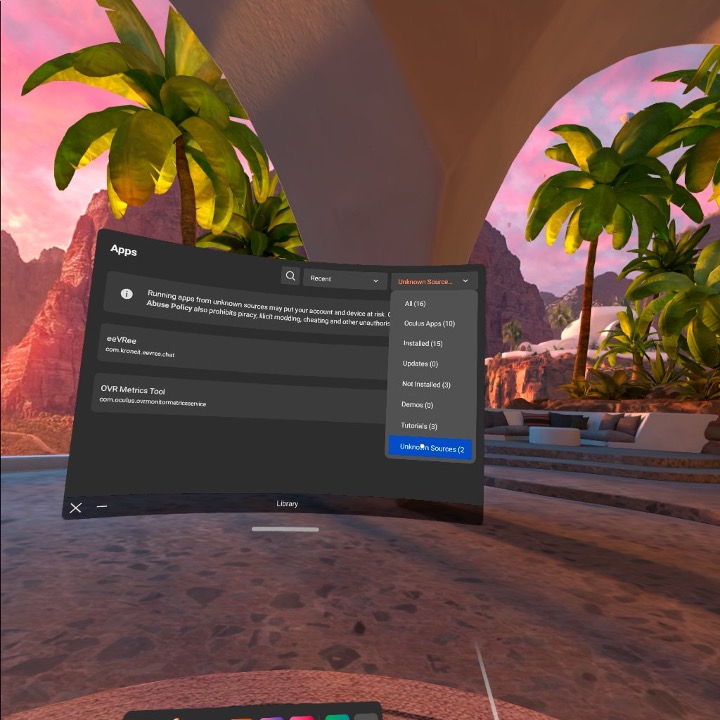
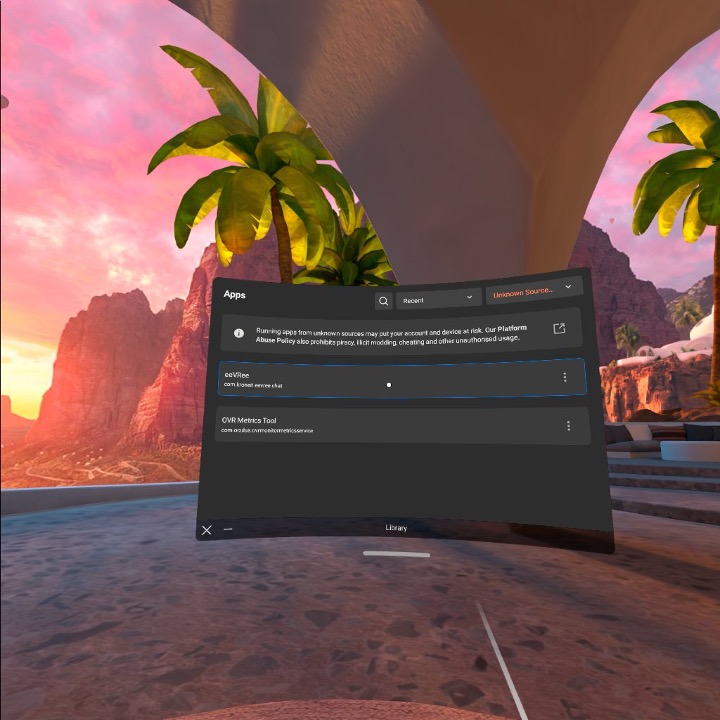
4.5. You can currently run the eeVRee application in the headset from the run – unknown sources menu (see screenshots)
4. Mac users only: Installing the eeVRee application
4.1. You will be provided with an installation file for eeVRee in a separate email, after downloading it to your Mac, go to the download folder and unzip the downloaded file
4.2. Ensure your Oculus Quest 2 is connected via USB cable to your Mac, is running and you finished the connection setup in step 3.
4.3. Install the SideQuest application from https://sidequestvr.com/setup-howto (based on your configuration, choose M1/ARM or Intel build)
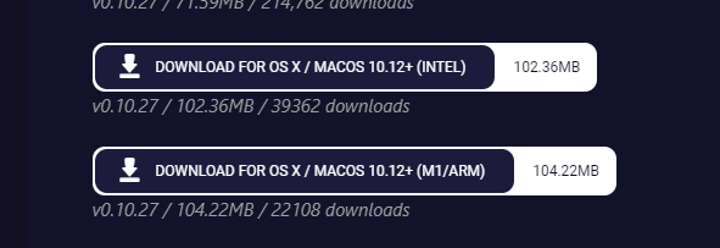
4.4. Run the SideQuest, it will automatically detect your connected headset
4.5. Go to “install apk file from folder”


4.7. After the installation completes, you can disconnect the headset from your Mac
4.8. You can currently run the eeVRee application in the headset from the run – unknown sources menu (see screenshots).
In next versions of eeVRee, installation on new devices is to be significantly simplified. Please see the FAQ or join the online installation support session if you need any assistance.
Thank you again for understanding, and see you in eeVRee!
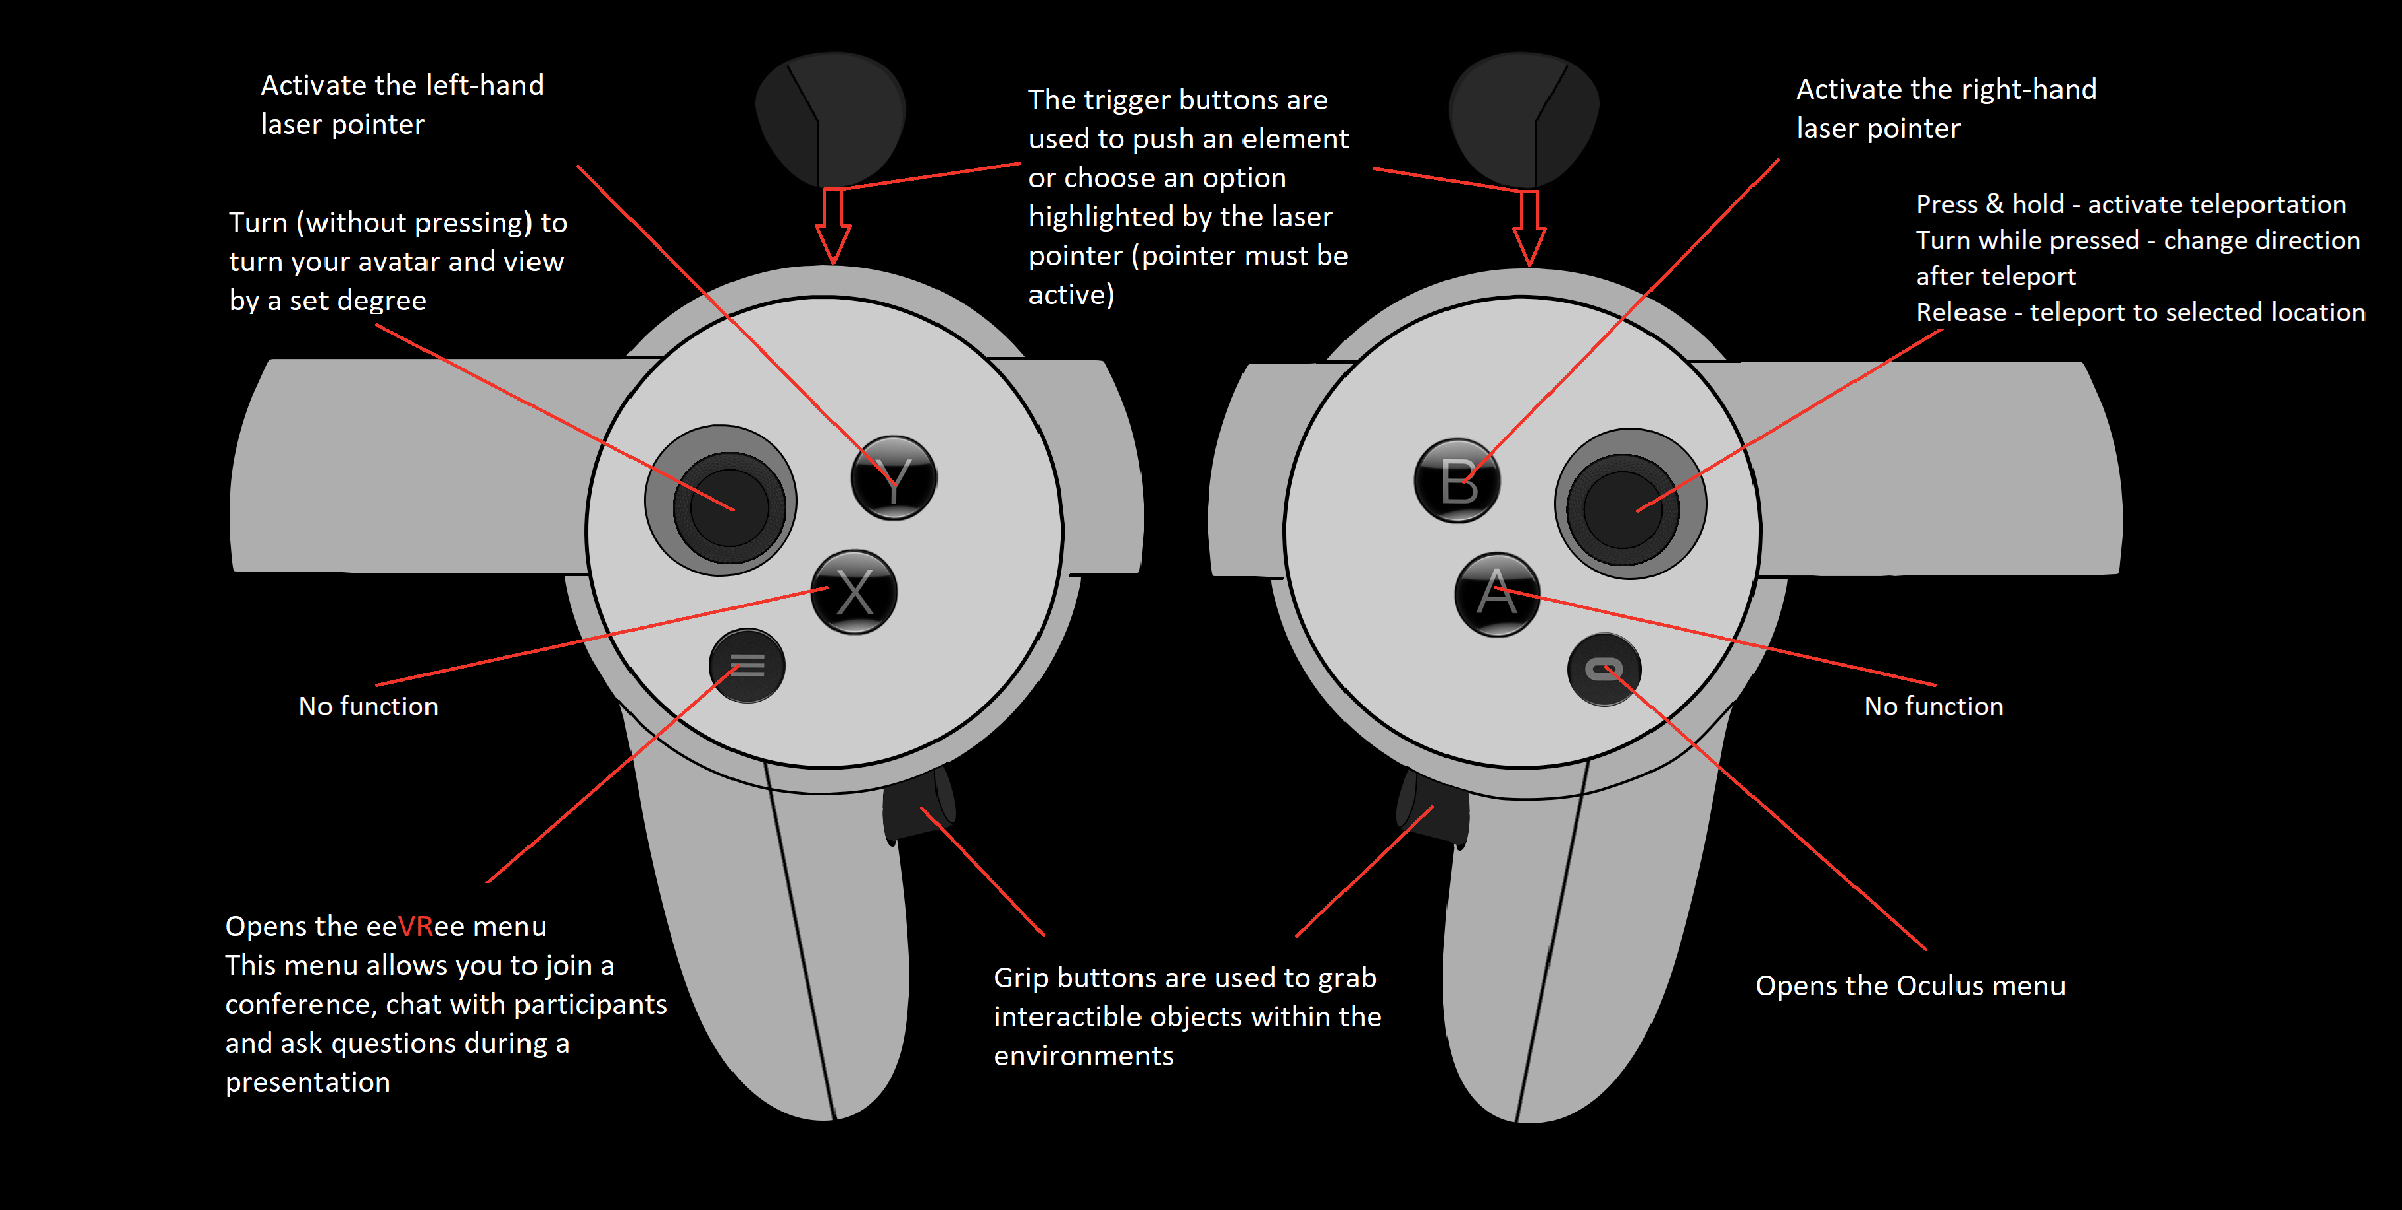
Controller schema
FAQs
1. Help, it feels like I’m a giant / leprechaun in the venue!
This means that the calibration of the floor of you Oculus Quest 2 is off, please exit the eeVRee application, restart the guardian setup and make sure your floor in VR corresponds to you floor in real life. Also make sure that you are either sitting or standing correctly during the floor calibration. See https://support.oculus.com/guardian/ if needed
2. How do I join a conference?
(see the control schema if needed) First, open the eeVRee menu, make sure you are logged in with your credentials and afterwards click the conference list button, I.e.

Here you can choose a conference for which you have a valid VR ticket
3. I cannot ask questions during a presentation!
Several possibilities. First, make sure you have joined a currently running presentation and that asking questions is enabled. Some speakers may wish to allow questions only at the end of their presentation, in which case you’ll see a notification that currently questions are disabled.
If all of the above is satisfied and you still can’t submit questions, please contact us at helpdesk@eevree.com.
4. I can’t type in my login credentials
In order to activate and use the keyboard, you need to have the laser pointer(s) on the controllers active and use the trigger buttons to “click” on what you want to choose.
Note that you can use one or both hands with active laser pointers to type quicker if you wish.
5. I’m stuck, can’t move or teleport.
While generally this shouldn’t be possible, there might be instances when you, by walking in real life, might cause issues if you clip through boundaries. In such cases the simplest solution is to close the application and rejoin the conference.
Also make sure that you haven’t been disconnected due to a network error, check you Wi-Fi connection is active and rejoin the conference.
6. I can’t hear or see the presentation
Aside from making sure that there is a currently running presentation in the chosen room, try leaving the presentation room and return to the main venue and rejoin the presentation room to restart the stream.
Also try to click on the choosing room button several times to ensure the video and audio loads if needed (3-7 click should be enough).
7. My eyes hurt, or my vision is blurry or I’m getting a headache
First, it is very important to set up your Oculus quest 2 correctly, ensure it has a good fit on your head, the lenses are clean and the IDP is set to the most comfortable level for you.
If the problem persists, immediately take a break and join us on our web player. For some first time users the VR experience can be a bit overwhelming, so take your time while you get accustomed to it.
8. Can I chat with other users?
Yes, you can also chat with available onsite users who are using their eeVRee mobile application! That’s one of the main advantages of eeVRee, so stay in touch with your peers!
9. I saw some other climbers in the bouldering, but there’s no one in Darts
Yes, we’ve currently build the darts minigame as a single-player experience, but expect new minigames in the future, that will allow you to synchronize with onsite and VR attendees!
10. I have a request, feature idea or feedback I’d like to share, where can I send it?
We will be sending a questionnaire after the conference is finished, but feel free to also contact us at helpdesk@eevree.com and thank you for helping us improve!